

Building a workflow
Updated on 07.07.26
9 minutes to read
Copy link
Overview
Design and deploy powerful, no-code identity verification workflows using SEON’s visual editor. This intuitive, drag-and-drop interface lets you build and customize end-to-end user journeys, define complex routing logic, and respond to fraud threats without writing a single line of code.
Each time a user completes a verification session, it appears as a workflow run in the Transactions page, where you can monitor outcomes and investigate individual sessions. See the reviewing workflow runs page for details on monitoring and investigation.
How it works
The Workflows tab is your canvas for creating identity verification flows. You can build a workflow by dragging different nodes (steps) onto the canvas and connecting them to define the user's path.
How to use it
You can find the workflow editor and manage all your workflow templates from the Workflows page in SEON.
- Head to the Workflows tab in SEON.
- Here you can see a list of all existing workflow templates, including their name, last update time and author.
- Click Create workflow in the top-right corner.
- Add a name and click Create.
You will then be taken to the visual editor with a blank canvas, ready to build your new IDV workflow.
Understanding workflow nodes
Each node in the workflow represents a specific action or decision point.
There are seven fundamental node types:
- Start workflow
- Data check
- Document verification
- Address verification
- Condition
- End workflow
Start workflow
Every workflow begins with the Start workflow block. This is automatically added when you create a new workflow and cannot be removed.
This block represents when a user begins their workflow run. It connects to whatever step comes first in your flow.
Previous workflow runs can be found on the Transactions page, under the Workflow runs tab.
Data check
What it does: Runs SEON's Fraud API to analyze the user's email, phone, IP address and device before they proceed to document capture.
When the user sees it: They don't — this runs automatically in the background.
Configuration: Click the Data check block to open settings, then toggle the checks you want to run:
| Toggle | What it enables |
| Email risk analysis (deliverability, domain age, breaches, social profiles) | |
| Phone | Phone number validation and carrier information |
| IP | Geolocation, VPN/proxy detection, ISP information |
| Device | Device fingerprinting, emulator detection, bot detection |
| AML | Sanctions, PEP, and adverse media screening |
| eKYC | Government database verification |
The block displays which checks are enabled (e.g., "Phone, Email, IP").
Document verification
What it does: Guides the user through capturing their identity document and verifies its authenticity.
When the user sees it: A camera interface with instructions to photograph their ID.
Configuration: Click the block to enable NFC, video recording or eID. Configure accepted documents in Settings/ID Verification.
What happens: The system checks for tampering, validates security features, extracts data via OCR, and verifies the document hasn't expired.
Selfie verification
What it does: Captures the user's selfie to confirm they're physically present and match their ID document.
When the user sees it: A camera interface for taking a selfie.
What happens: The system performs a liveness check (to prevent spoofing with photos or videos) and compares the selfie to the portrait on the ID document.
Using with conditions: You can check selfie.verification.status in a Condition block to route users based on the result (passed, failed, abandoned).
Address verification
What it does: Verifies the user's residential address using utility bills, bank statements, or official correspondence.
When the user sees it: An interface to photograph or upload their address document.
What happens: The system validates the document's authenticity, extracts the address, and optionally matches the name against the ID document.
Condition
What it does: Creates branching paths based on data from previous steps.
When the user sees it: They don't; routing to different steps happens automatically.
Configuration: Click the Condition block to open the settings panel. You can add multiple conditions, each with:
1. Field to check: Select from a dropdown (e.g., "IP country", "Phone number", "Username")
2. Operator: How to compare (e.g., "is either", "is passed", "is failed")
3. Values: What to compare against (e.g., specific countries, status values)
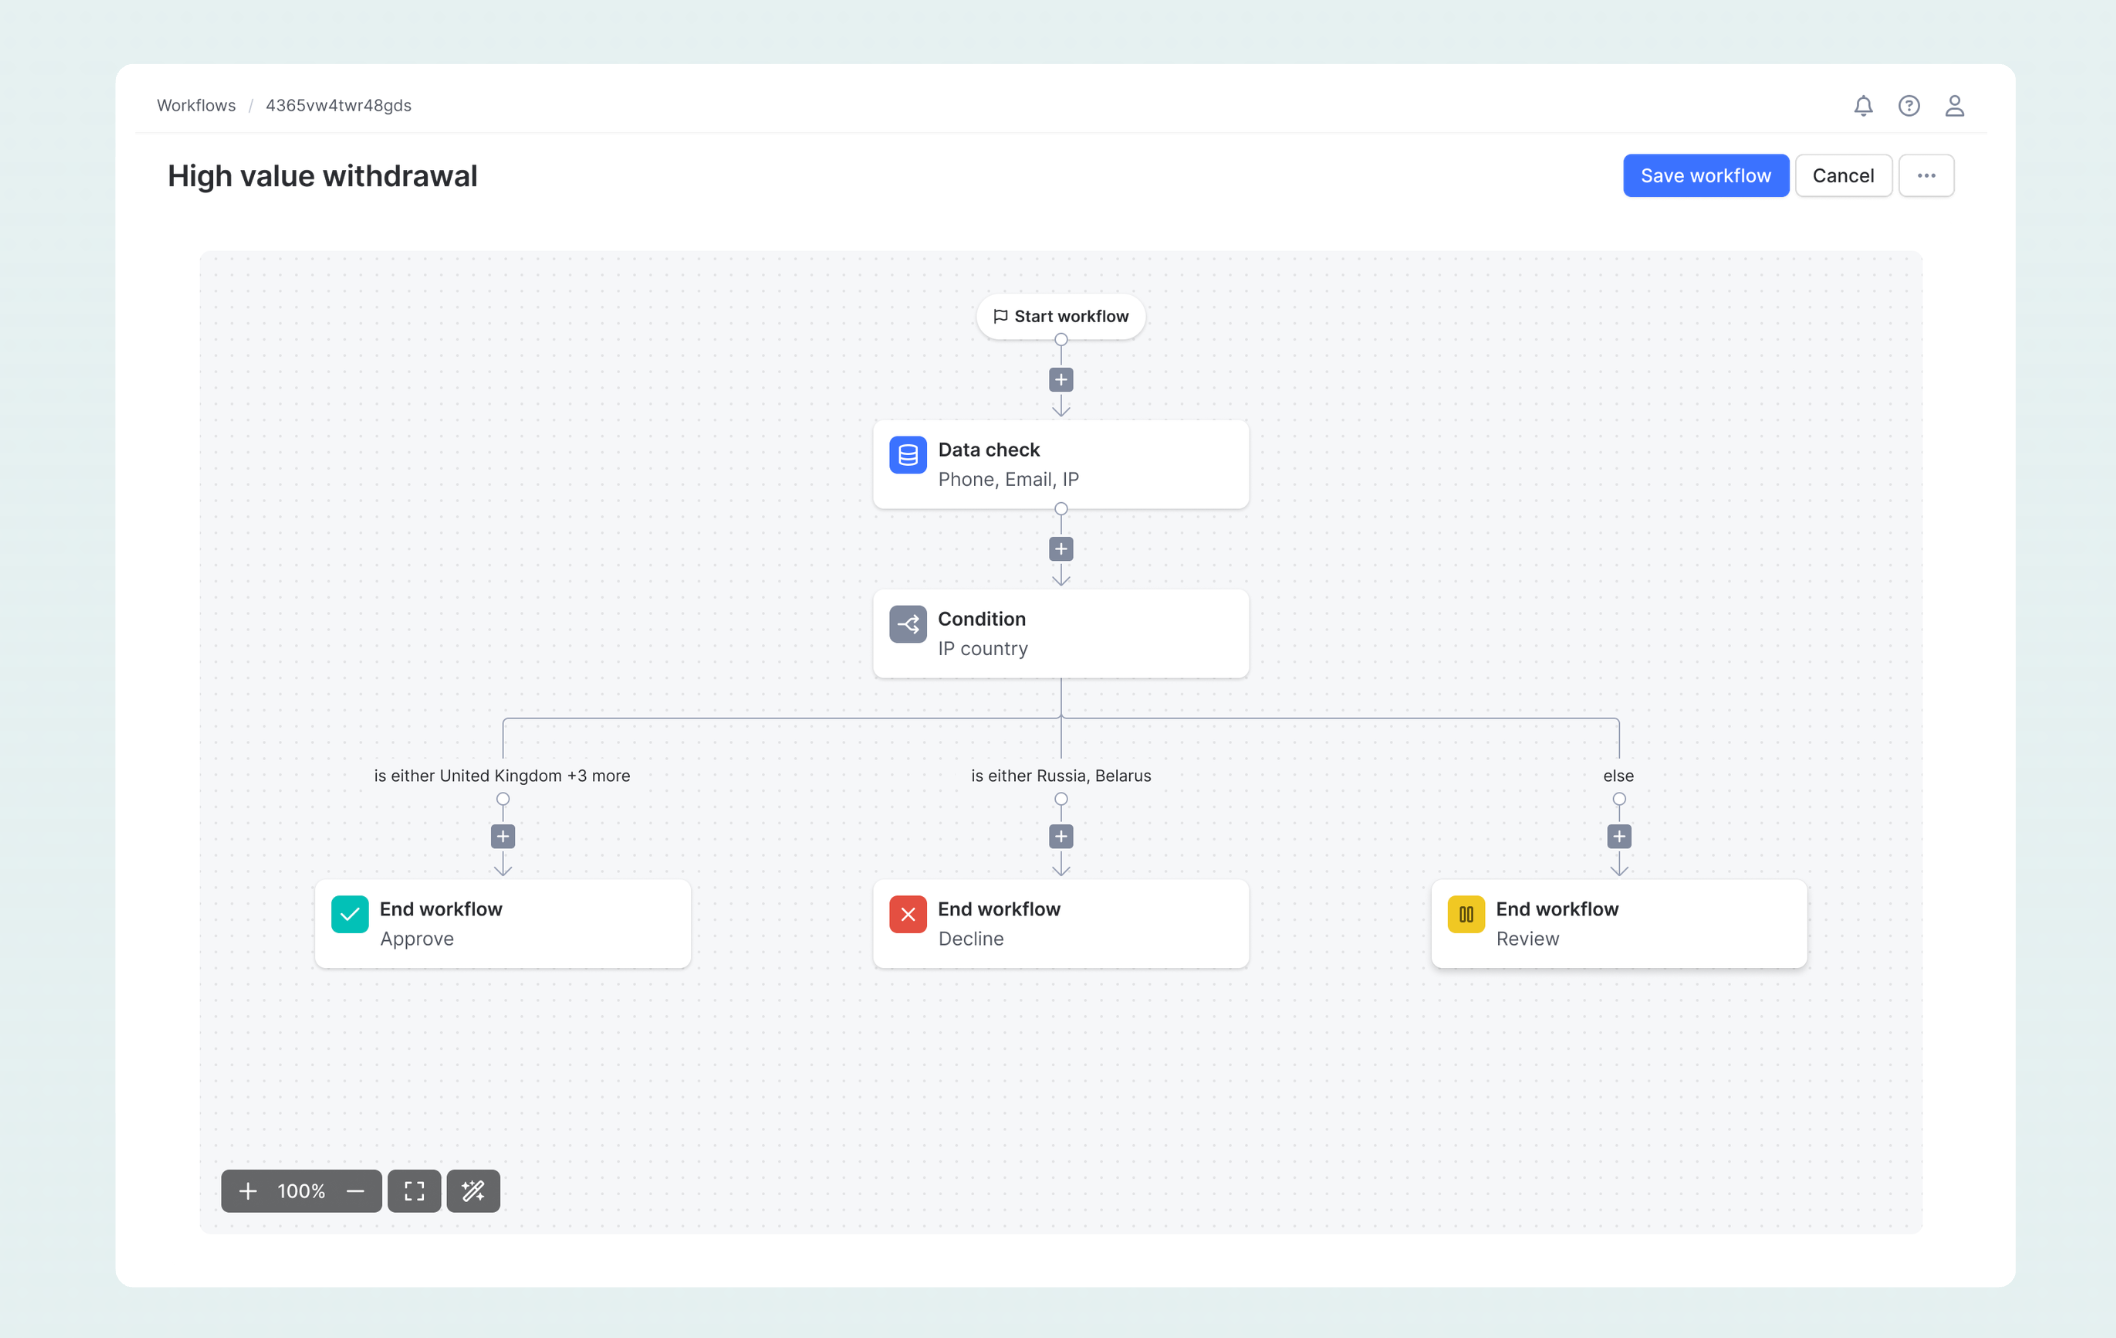
Example: A condition checking "IP country" with operator "is either" and values "United Kingdom, Ireland, Germany, Netherlands, France" creates one path, while "is either Russia, Belarus" creates another path, with an "else" path for everything else.
Adding conditions: Click + Add condition to add more rules. Each condition creates a new branch.
Branch labels: The canvas shows labels on each branch indicating the condition (e.g., "is either United Kingdom +3 more", "is either Russia, Belarus", "else").
End workflow
What it does: Terminates the workflow and assigns the final decision.
When the user sees it: A completion screen with the result.
Configuration: Click the End workflow block to select the workflow state:
- Approve: User passed verification (shown with green checkmark icon)
- Decline: User failed verification (shown with red X icon)
- Review: Requires manual analyst review (shown with yellow icon)
Important: Every path through your workflow must end with an End workflow block. If a path is incomplete, the workflow will be marked as "UNFINISHED TEMPLATE" in the workflow list. Unfinished templates can still be triggered, but users who reach an incomplete path will automatically be routed to Review status. To resolve this, open the workflow in the editor and ensure every branch terminates with an End workflow block. See the managing workflows page for more on identifying and completing unfinished templates.
Defining conditions
Condition nodes are the brains of your workflow, enabling you to create intelligent, risk-based routing. You can build conditions using data fields in SEON, allowing for highly granular and customized decision logic.
When building a condition, you can use data from any of the following categories:
- Identity verification
- Document checks: Authenticity result, tampering detection, photocopy/screen detection, document expiry, MRZ validity
- OCR extraction: Full name, date of birth, document number, issuing country, address, nationality, gender
- Selfie check: Face match score, face match result, selfie quality, reference image source
- Liveness check: Liveness result, spoof detection, passive/active liveness outcome, confidence score
- Proof of address: PoA result, document type, address extracted, name match score, date validity
- Fraud API and device
- Email intelligence: Domain age, deliverability score, breach history, disposable email detection
- Phone intelligence: Carrier type, line type (mobile/landline/VoIP), phone validity, country code
- IP and network: IP country, VPN/proxy detection, data center flag, Tor exit node, ISP type
- Social profiles: Linked accounts (LinkedIn, Facebook, Twitter, etc.), profile age, account activity
- Device fingerprint: Device type, OS, browser, emulator detection, incognito mode, screen resolution
- Risk scores: Fraud score, email score, phone score, IP score, overall risk level
- Compliance and eKYC
- AML screening: Watchlist matches, PEP status, sanctions hits, adverse media flags, match confidence
- eKYC checks: CPF validation (Brazil), SSN verification (US), Aadhaar match (India), national ID cross-checks
- Data matching: Name match result, DOB match, address match, document-to-input consistency
- Custom and workflow
- Custom fields: Any data passed in your workflow trigger (transaction amount, user tier, action type)
- Workflow state: Previous node outcomes, step completion status, accumulated risk indicators
Condition operators
Build precise conditions with a flexible set of logical operators. The available operators are dynamically determined based on the field type you select (e.g., text fields support pattern matching, while numeric fields support comparison operators).
| Operator type | Operators |
| Equality | is, is not, is either, is neither |
| Comparison | greater than, less than, between |
| Existence | is empty, is not empty, exists |
| Pattern | contains, starts with, ends with |
Example use cases for conditions
| Scenario | Example condition logic |
| Fast-track trusted users | IF ip_country is either UK, DE, FR, then approve |
| Block high-risk regions | IF ip_country is either RU, BY, then decline |
| Escalate VPN users | IF vpn_detected = true, then add selfie check |
| Score-based routing | IF fraud_score > 80, then manual review |
| Premium user bypass | IF custom.user_tier = "premium", then skip sML check |
Workflow validation
The workflow editor has built-in validation to prevent common configuration errors and ensure your workflows are robust:
- Incomplete flows: The editor will warn you if a workflow branch does not have a proper End workflow node.
- Duplicate names: You cannot save a workflow with the same name another active workflow; however, you can reuse names from previously deleted workflows.
- Circular loops: The editor automatically blocks you from creating infinite loops (e.g., connecting a node back to itself).
Workflow editor controls
The editor includes several control features to make building complex workflows easier and can be found in the bottom left corner of the workflow editor page:
- Left: Zoom and pan allows zooming in and out of the workflow to see large complex workflows with ease.
- Middle: Full screen will expand the editor so you can see it at full screen.
- Right: Organize blocks helps automatically arrange your workflow neatly.
How workflows create transactions
Every step in a workflow generates a transaction in SEON via the Fraud API. This means:
- Each step creates its own transaction record
- You can see these transactions in the Transactions page, linked to the workflow run
- The same fraud signals, rules, and scoring apply as with direct Fraud API calls
- Transactions from a workflow run are connected, allowing you to see the full verification journey
This is important when designing workflows — a workflow with multiple verification steps will generate multiple transactions, each with its own fraud assessment.